Introduction
This guide teaches you how to turn a Raspberry Pi into an ad and tracker blocker for your entire home network. No external services, no monthly fees.

What you'll get:
- Block invisible trackers (Google Analytics, Facebook Pixel…)
- Eliminate ad networks (DoubleClick, Criteo, Taboola…)
- Cut unwanted telemetry (Windows, Smart TVs, Apple…)
- Protection against malware and phishing
Important:Pi-hole blocks at the DNS level, which means it CAN'T block YouTube ads (for example, because they come from the same domain as the videos). For that you'll need a browser to install the uBlock Origin extension. I personally use Librewolf (which comes with it built in), a privacy-focused Firefox fork, and/or Brave, a Chromium fork with its own built-in blocker called Brave Shields. Pi-hole and these browsers are entirely complementary layers.
- Estimated time: 1 hour
- Difficulty: Beginner (no fear of the terminal)

Requirements
- Raspberry Pi (any model, even 512MB ones work). You can find them very cheap second-hand.
- microSD card (8GB minimum)
- USB charger (depending on the Pi model, one or another fits better)
- Ethernet cable (to connect it to the router)
- Keyboard and HDMI screen (only for the initial setup)
- Your computer (to control it via SSH afterwards)
Basic concepts
What is DNS?
The "phone book" of the internet. It translates google.com → 142.250.185.46.
What does Pi-hole do?
A black hole for ads. It's a DNS server with a blacklist: when something on your network asks "where is ads.facebook.com?", Pi-hole replies: "no idea what you're talking about".
Step 1: Prepare the SD card
- Download Raspberry Pi Imager
- Plug the SD into your computer and open Imager
- OS: Raspberry Pi OS (other) → Raspberry Pi OS Lite (32 or 64-bit, depending on your model)
- Storage: your SD
- Write → Wait a few minutes
Once finished, eject the SD from your computer.
Step 2: First boot with keyboard and screen
- Insert the SD into the Pi
- Plug the ethernet cable into the router
- Connect a USB keyboard and an HDMI cable to a screen
- Plug in the charger and wait for it to boot
The first time you'll have to create a user and password. Write it down carefully.
Step 3: Enable SSH
SSH (Secure Shell) is a protocol that lets you control the Pi from your computer remotely and securely, without needing a keyboard or screen connected to it.
sudo raspi-configNavigate with the arrow keys: Interface Options → SSH → Yes → Finish
Now find out your Pi's IP:
hostname -I You'll get something like 192.168.1.50. Write it down. Then shut down the Pi and disconnect the keyboard and screen:
sudo shutdown nowPlug it back in with only the ethernet cable connected to the router.
Step 4: Connect via SSH from your computer
Linux/Mac: SSH comes pre-installed, open the terminal. Windows 10/11: SSH comes pre-installed, open PowerShell or CMD. Older Windows: download PuTTY if ssh doesn't work.
ssh pi@192.168.1.50 The first time it'll ask if you trust the host → type yes. Enter the password you set up. You'll do the rest of the steps from here.
Step 5: Update the system
sudo apt update && sudo apt upgrade -yThis may take a few minutes
Step 6: Install Pi-hole
curl -sSL https://install.pi-hole.net | bashThe interactive wizard will ask you the following:
- Static IP? → Continue
- Upstream DNS: Quad9 (filtered, DNSSEC) ← Recommended. Quad9 is a public DNS server focused on privacy and security that filters known malicious domains.
- IPv4/IPv6: IPv4 (or both)
- Static IP confirm: Yes
- Web interface: Yes
- Web server: Yes
- Log queries: Yes (Show everything)
- Privacy mode: Show everything (0)
At the end it'll give you a password for the web panel. Save it!
Step 7: Add block lists
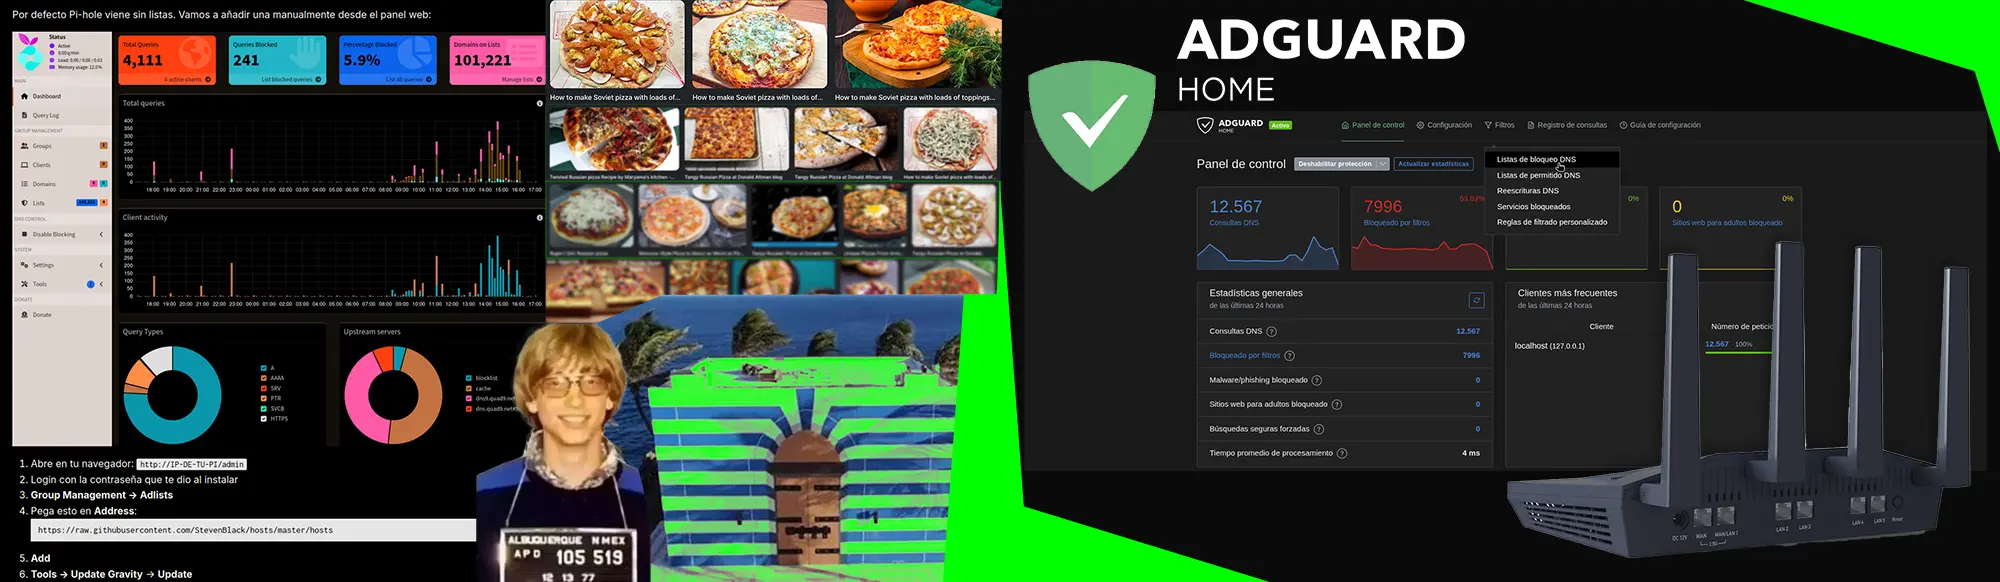
By default Pi-hole ships without lists. Gravity is Pi-hole's system that downloads and compiles block lists into a local database. We'll add one manually from the web panel:
- Open in your browser:
http://YOUR-PI-IP/admin - Log in with the password you got during installation
- Group Management → Adlists
- Paste this into Address:
https://raw.githubusercontent.com/StevenBlack/hosts/master/hosts - Add → Tools → Update Gravity → Update
Verify it works from the SSH terminal:
sudo pihole -q doubleclick.netIt should say it's on the block list.
Step 8: Configure your router to use Pi-hole
Now comes the magic: making every device on your network use Pi-hole as DNS.
Important: Pi-hole does NOT automatically affect all your devices. It will only work on those that get their DNS from the router. If any device has a DNS manually configured like Google's 8.8.8.8, that device will NOT go through Pi-hole.
The router interface varies a lot by brand and model. The concept is the same: find where DNS is configured.
- Access your router panel, usually at
192.168.1.1,192.168.0.1,192.168.1.254or192.168.0.254. The username and password are usually on the router label. - Find the DHCP / LAN / DNS section. Something like "DHCP Server", "LAN Settings", "DNS Settings", "Primary DNS / Secondary DNS".
- Primary DNS: your Pi's IP (example:
192.168.1.50) - Secondary DNS: the same Pi IP (example:
192.168.1.50) - Save and restart the router.
About secondary DNS: many people think it's a "backup" in case the primary fails. That is NOT true. Devices may use either of the two randomly. If you put 8.8.8.8 as secondary, many queries will go directly to Google and Pi-hole won't see or block them. That's why it's essential to put your Pi's IP in both.
In my experience, configuring only the router wasn't enough. I also had to configure DNS manually on each device:
- Linux: Network settings → Your connection → IPv4 → DNS
- Windows: Control Panel → Network Center → Adapter → Properties → IPv4 → DNS
- Mac: System Preferences → Network → Your connection → Advanced → DNS
- Android/iOS: WiFi settings → Your network → Configure DNS → Manual
In every case, put your Pi's IP as primary and secondary.
Step 9: Verify it works
Test 1:
nslookup doubleclick.net It should show Server: 192.168.1.50 and Address: 0.0.0.0 (blocked). If a different server shows up, your device is NOT using Pi-hole.
Test 2: visit http://doubleclick.net in the browser. It should error out.
Test 3: web panel http://PI-IP/admin → Tools → Query Log. Browse the internet and you'll see allowed and blocked lines.
Management and troubleshooting
Basic commands:
pihole status              # Check Pi-hole status
sudo pihole -g             # Update lists (do this once a month)
pihole -q domain.com       # Check if a domain is blocked
pihole -w domain.com       # Add to whitelist (unblock)
pihole -t                  # Watch queries in real time
pihole -up                 # Update Pi-hole to the latest version
Common issues:
- My devices aren't using Pi-hole: Restart router and devices. Make sure you set the Pi's IP as both primary AND secondary.
- Pi-hole stopped working after rebooting the Pi: The router assigned it a different IP. In your panel look for "DHCP Reservation" or "Static Leases" and pin the same IP to the Pi's MAC address (you can see it with
ip link show eth0,link/etherline). - Firefox ignores Pi-hole: it has DNS-over-HTTPS enabled. Turn it off in Settings → search "DNS" → DNS over HTTPS: Off.
- A website/app stopped working: false positive. From the web panel: Query Log → click the blocked domain → Whitelist. Or from terminal:
pihole -w legit-domain.com
Regular maintenance:
- Update lists once a month:
sudo pihole -g - Back up your configuration: Web panel → Settings → Teleporter → Backup
Bonus: Pi-hole + Tailscale (use it outside the house)
If you already have Tailscale set up, you can make Pi-hole work even outside your home (work, hotel, mobile data).
# 1. Install Tailscale on the Pi
curl -fsSL https://tailscale.com/install.sh | sh
sudo tailscale up

# 2. Note your Pi's Tailscale IP (100.x.x.x)
# Go to login.tailscale.com/admin/dns and add that IP as DNS.
Result: tracking blocked wherever you are.
If Tailscale interferes with local Pi-hole: sudo tailscale set --accept-dns=false
The end
You now have your own ad and tracker blocker running on a recycled Raspberry Pi. No fees, no third-party services, 100% under your control.
Now go to the Query Log and discover which companies were following you without you knowing. Get ready to be surprised.
If you have any questions, we'd be happy for you to contact us and try to solve any problem that comes up.
The invisible becomes visible.
But before we say goodbye, a personal note: I currently use a GL.iNet Flint 2 router and on it I have AdGuard Home running directly on the router. No Raspberry Pi. No extra steps. AdGuard Home comes integrated into GL.iNet's firmware and is activated from the router's own panel; from there you can add the best block lists with a couple of clicks. If you already have Pi-hole running, great. If you're thinking of renewing your router anyway, a GL.iNet is a good move: these routers come with OpenWrt, the most well-known and respected Linux distribution for routers, which gives you ad and tracker blocking directly on the network hardware, plus total control over your home network.